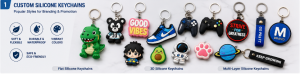
矽膠鑰匙圈以其耐用性、彈性和可客製化的設計而成為廣受歡迎的配件。無論您是想開展小型手工藝事業、製作獨特的禮品,或是為您的鑰匙圈系列增添個人風格,製作矽膠鑰匙圈都是一個既有趣又容易實現的專案。在這份全面的指南中,我們會教你製作矽膠鑰匙扣的確實步驟、你需要的基本機器和工具、它們的功能,並回答常見的問題,幫助您避免犯錯。讓我們深入了解!
製作矽膠鑰匙扣前所需準備的物品
在開始生產流程之前,收集所有必要的材料、機器和工具至關重要。適當的準備工作可確保順利的工作流程和高品質的結果。以下是必需品的詳細清單,包括機器及其特定作用。.
1.材料
-
液態矽膠(首選:食品級或環保型,有多種顏色可供選擇,或透明可供上色)
-
矽膠固化劑(與液態矽膠類型相符,通常為 10:1 或 5:1 的混合比例)
-
鑰匙扣配件(分離環、龍蝦扣、鑰匙扣環)
-
著色顏料(矽性、油性或液體顏料)
-
脫模劑(方便將已固化的矽膠從模具中取出)
-
攪拌杯和攪拌棒(拋棄式或可重複使用,矽膠不產生反應)
-
手套(乳膠或丁腈手套,保護雙手,避免污染矽膠)
-
設計元素(可選:亮片、亮片、小吊飾或自訂插入物,如照片)
2.基本機器和工具 + 其功能
合適的機器可大幅提升矽膠鑰匙圈的生產效率與品質,尤其是當您打算小量生產或擴大規模時。以下是必備的機器及其作用:
| 機器/工具 | 功能 |
| 矽膠模具製造機(DIY 可選,批量生產必備) | 自動化製作精確、可重複使用的矽膠模具。它能均勻混合製模材料、控制溫度和壓力,並確保模具表面平滑。在製作多個鑰匙扣時,是一致設計的理想選擇。. |
| 矽膠攪拌機(電動攪拌機) | 徹底均勻地混合液態矽膠和固化劑。手動混合可能會產生氣泡和固化不均勻,而電動攪拌器可確保混合物平滑無氣泡。有些機型還可針對不同的矽膠黏度調整速度設定。. |
| 真空脫氣機 | 去除混合矽膠中的氣泡。矽膠混合物中的氣泡會導致最終的鑰匙扣出現孔洞或瑕疵。本機器可創造真空環境以去除氣泡,確保矽膠完全填滿模具並均勻固化。. |
| 熱壓機(或小規模烤箱) | 加速矽膠的固化過程。矽膠可在室溫下固化,但熱壓機或烤箱可控制溫度(通常為 80-120°C)和壓力,將固化時間從數小時縮短至 10-30 分鐘。這也提高了鑰匙扣的硬度和耐用性。. |
| 模切機 (選購) | 用於修剪固化鑰匙扣上多餘的矽膠,或在模具無法切割出完美邊緣時,切割出客製化的形狀。是製作乾淨、專業造型的理想工具,尤其適用於複雜的設計。. |
| 鑽孔機(小型手持式或桌上型) | 可製作孔洞以安裝鑰匙扣配件(分扣環、扣環)。它可確保孔的精確度,並且不會使固化的矽膠破裂。選擇小鑽頭(1-2mm)以達到最佳效果。. |
矽膠鑰匙扣製作步驟指南
現在您已經準備好所有的材料和機器,讓我們一步步來。本指南涵蓋小規模的 DIY 製作和使用基本機器的半批量製作。.
步驟 1:設計並製作模具
模具是矽膠鑰匙扣的基礎,它的形狀和細節將直接影響最終的產品。您可以使用兩種方法製作模具:手工製作模具(用於 DIY)或機器製作模具(用於批量生產)。.
-
設計您的鑰匙扣:在紙上勾勒出您想要的形狀(如動物、標誌、名稱、幾何圖形)。如果您想要 3D 設計,請使用黏土、樹脂或 3D 列印製作原型。原型應比最終的鑰匙扣略大(矽膠在固化過程中會輕微收縮)。.
-
準備模架:使用一個小盒子,或用木頭或塑膠製作一個框架來放置製模材料。將原型放在框的中央。.
-
混合製模矽膠:如果使用矽膠製模機,請按照機器的指示來混合模具矽膠和固化劑。如果是 DIY,請使用攪拌棒以建議比例 (例如 10:1)手動混合。確保充分混合(2-3 分鐘),以避免固化不均勻。.
-
倒入模具矽膠:將混合好的矽膠慢慢倒在原型上,完全覆蓋原型(至少高出原型 0.5 公分)。使用真空脫氣機去除模具矽膠上的氣泡(可選,但建議使用於光滑的模具)。如果沒有機器,請輕輕敲打框架以釋放氣泡。.
-
固化模具:讓模具矽膠在室溫下固化(6-12 小時),或使用熱壓機來加速固化(80°C 下 30 分鐘)。固化後,小心地將原型從模具中取出。您的客製化模具就準備好了!
步驟 2:為鑰匙扣準備矽膠混合物
-
測量鑰匙圈矽膠:將所需數量的液態矽膠倒入混合杯中。根據模具的大小來計算用量(先將模具裝滿水測量體積,然後再使用相同體積的矽膠)。.
-
添加著色顏料(可選):如果您想要彩色鑰匙圈,可在液態矽膠中加入少量矽膠專用顏料。充分攪拌,直到顏色均勻。.
-
與固化劑混合:按建議比例將固化劑加入矽膠混合物中(請查看產品標籤)。為達到最佳效果,請使用矽膠攪拌機攪拌 2-3 分鐘,以確保不產生氣泡,且混合均勻。如果是手動攪拌,請慢慢攪拌以避免產生氣泡。.
-
混合物脫氣:將混合好的矽膠放入真空脫氣機。打開機器,讓它運轉 2-5 分鐘,直到所有氣泡都被排出。如果您沒有脫氣機,可讓混合物靜置 10-15 分鐘,讓氣泡浮上表面,然後用牙籤戳破氣泡。.
步驟 3:將矽膠倒入模具中
-
塗上離型劑:將脫模劑輕輕噴灑或刷在模具內部。這有助於固化後的矽膠鑰匙圈輕鬆脫模,而不會黏住或損壞模具。.
-
倒入矽膠混合物:從一角開始,慢慢將脫氣的矽膠混合物倒入模具中。完全填滿模具,確保矽膠覆蓋模具的所有細節。輕輕敲打模具以釋放剩餘的氣泡。.
-
添加設計元素(可選):如果您想添加閃粉、亮片或小吊飾,請在固化前將它們放入矽膠混合物中。使用鑷子準確定位。.
步驟 4:固化矽膠鑰匙圈
固化時間取決於矽膠的類型以及您是否使用機器。這裡有兩種選擇:
-
室溫固化:讓模具在室溫 (25-30°C) 下放置 4-8 小時。固化過程中避免移動模具,以防止形狀不均勻。.
-
機器固化(更快、更好):將模具放入熱壓機中。設定溫度為 80-100°C,壓力為 0.3-0.5 MPa。固化 15-30 分鐘(確實時間和溫度請參考矽膠產品說明書)。熱壓機可確保鑰匙扣均勻固化、質地較硬,並可減少收縮。.
步驟 5:脫模並完成鑰匙圈
-
小心地拆卸:矽膠完全固化後(觸感應該是堅固而不黏的),將模具輕輕地從鑰匙圈上剝離。從邊緣開始剝離,避免撕裂鑰匙扣或模具。.
-
修剪多餘的矽膠:使用模切機或鋒利的美工刀修剪多餘的矽膠或粗糙邊緣。對於複雜的形狀,模切機可以提供乾淨、專業的完成效果。.
-
為硬體鑽孔:使用小型鑽孔機在鑰匙扣的頂端(您要安裝鑰匙扣硬件的地方)開一個孔。慢慢鑽孔,以免矽膠破裂。用軟布清潔孔,以去除矽膠灰塵。.
-
安裝鑰匙圈硬體:將分接環插入鑽好的孔中,然後套上龍蝦扣或鑰匙扣環。您的矽膠鑰匙扣就快完成了!
-
波蘭語(可選):如果鑰匙扣的表面是霧面的,而您希望它有光澤,請使用拋光布輕輕地拋光表面。.
步驟 6:品質檢查
檢查鑰匙扣是否有任何瑕疵、孔洞或不平整的邊緣。檢查五金件是否穩固連接。如果有任何錯誤 (例如:氣泡、顏色不均),請調整下一批的製程 (例如:脫氣更久、攪拌更徹底)。.
問與答:關於製作矽膠鑰匙扣的常見問題
Q1: 為什麼我的矽膠鑰匙圈固化後會黏黏的?
答:矽膠發黏通常由兩個問題造成:1) 矽膠與固化劑的混合比例不正確(固化劑太少)。2) 未完全固化(時間或溫度不足)。要解決這個問題,請確保您嚴格遵循建議的混合比例(使用刻度以確保準確性),並延長固化時間或提高溫度。如果鑰匙扣仍然黏黏的,可以塗上一層薄薄的矽膠密封劑,再重新固化一次。.
Q2: 沒有真空脫氣機也可以製作矽膠鑰匙扣嗎?
答:是的,您可以在沒有脫氣機的情況下製作 DIY 矽膠鑰匙扣,但較容易產生氣泡。為了減少氣泡,請將矽膠和固化劑慢慢混合,靜置 10-15 分鐘讓氣泡浮起,倒入模具後輕輕敲打模具。如果是批量生產或高品質的產品,建議使用真空脫氣機,以避免瑕疵。.
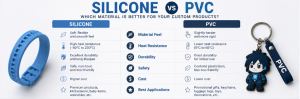
Q3: 哪種矽膠最適合製作鑰匙扣?
答:最適合鑰匙扣的矽膠是液態加成固化矽膠。它的透明度高、柔軟性好,而且固化後的效果持久耐用。如果您打算出售鑰匙扣,請選擇食品級或環保矽膠(它更安全,也更能吸引顧客)。避免使用冷凝固化矽膠,因為它可能會釋放有害氣體,而且壽命較短。.
Q4: 矽膠模具可以使用多久?
答:一個高品質的矽膠模具可以使用 20-50 次,這取決於矽膠的種類和您對它的保養。為了延長模具的使用壽命,每次使用後請用溫水和中性肥皂清潔,避免使用會刮傷模具的尖銳工具,並將模具存放在陰涼乾燥的地方,避免陽光直射。.
Q5: 我可以在矽膠鑰匙扣上添加照片或紙張設計嗎?
答:可以!您可以在矽膠鑰匙扣中插入照片或紙張設計,但您需要先將紙張密封(矽膠會損壞未塗層的紙張)。在照片上塗上一層透明樹脂或覆膜,待其乾透。然後放入模具中,再倒入矽膠。確保照片完全被矽膠覆蓋,以防水損。.
Q6: 開始製作矽膠鑰匙扣需要多少錢?
答:對於 DIY 初學者,成本約為 $50-$100(材料:矽膠、固化劑、五金、顏料;基本工具:攪拌杯、攪拌棒、電鑽)。小規模批量生產(使用混合機和熱壓機)的成本約為 $300-$500。如果出售鑰匙扣(矽膠鑰匙扣的利潤率很高,每個售價為 $5-$20),則可以很快收回投資。.
最終想法
無論您是 DIY 愛好者還是小企業主,製作矽膠鑰匙扣都是一個既簡單又有益的項目。只要依照步驟指南,使用正確的機器和材料,並從常犯的錯誤中學習,您就能創造出高品質的客製化鑰匙扣,讓自己脫穎而出。如果您在線上銷售,請記住優先考慮品質和安全(使用環保材料),以吸引更多顧客。.
如果您有製作矽膠鑰匙扣的其他問題,歡迎在下方留言!別忘了與我們分享您的 DIY 矽膠鑰匙扣作品。.